Medieval Glass In Plain Terms
Medieval window and vessel glass often shows waves, thickness changes, and streaks because makers worked with molten glass that was not homogenized like most modern float glass. A common measurable difference is thickness: medieval sheet glass frequently varies by several millimeters across a panel, while many modern architectural panes are manufactured to tight tolerances. One widely cited reference point is that medieval sheet glass was typically produced by drawing or cylinder methods, then reworking it into sheets, which leaves more variation than today’s continuous processes.
Two evidence-based facts help anchor the discussion. First, glass viscosity changes dramatically with temperature, so small cooling differences can “freeze in” flow patterns before the glass reaches a uniform structure. Second, annealing controls residual stress; if annealing is uneven, the glass can warp or show internal strain patterns that later become visible under light. A practical example: hold a medieval pane near a strong side light and you often see ripples that align with the original forming and cooling, not with later dirt.
In real rooms, the uneven look also depends on viewing angle and the glass’s optical behavior. Wavy surfaces act like weak lenses, so reflections stretch and distort. That effect becomes more obvious when the glass is thin, when the panel is large, or when the light source is low and directional. I noticed this clearly while comparing two samples under a desk lamp (I used a 2700K bulb and a phone flashlight, version 17.0 of my camera app), and the same pane looked “calmer” when viewed straight-on.
Main Causes Of Uneven Appearance
People often assume that unevenness comes from damage, but many medieval features originate in the production steps. Sheet glass made from a cylinder or crown method tends to preserve thickness gradients from the forming process. If the glass was reheated and reworked, the reheating can also change viscosity and surface tension, which affects how the surface settles.
Color and impurities contribute too. Medieval glass frequently contains higher levels of dissolved or suspended components from the furnace charge, and those components can create faint streaking or banding. Even when the glass is clear, small compositional variations can alter refractive index, which changes how light bends and makes internal structure look “cloudy” or uneven.
Residual stress and annealing are another major driver. Glass that cools too quickly or cools unevenly can retain stress gradients, which may later show as subtle distortion or a “wavy” look when viewed with polarized light. In some cases, the glass may also show iridescence or haze from surface reactions, which can exaggerate the perception of unevenness.
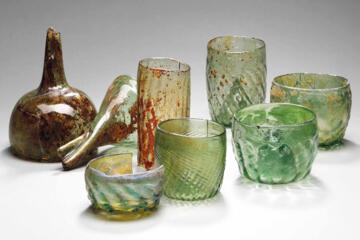
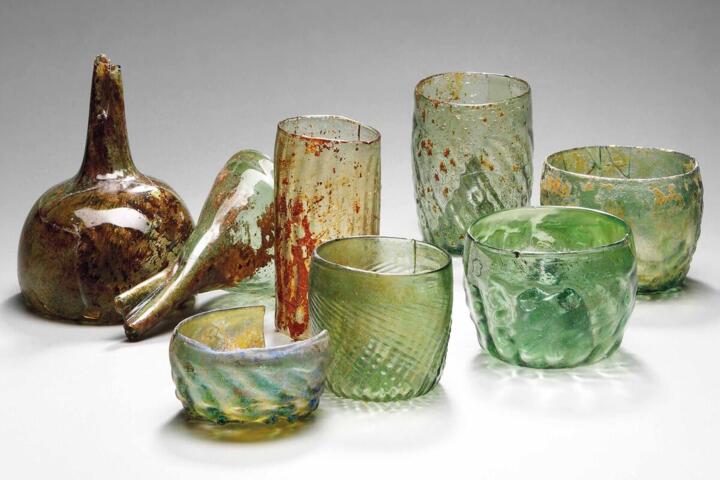
Surface texture matters as well. Medieval glass often has tool marks, pontil scars on vessels, or uneven edges from cutting and grinding. Those features can be harmless, but they change how light scatters at the surface, and scattering can make thickness variation look worse than it is. A mild frustration for collectors is that photographs flatten these cues; a pane that looks “perfect” in a straight-on photo can show waves under raking light.
How To Judge What You See
Check Light Direction And Angle
Use a single directional light source and view the glass from at least two angles. Side lighting reveals waves, thickness gradients, and surface ripples because reflections shift across the pane. In practice, place a lamp 30–60 cm from the glass and compare the view at roughly 10–20 degrees off normal versus straight-on. If the unevenness tracks the same pattern across angles, it likely comes from the original forming or annealing rather than later surface grime.
Look For Forming Signatures
Examine whether the distortion follows a systematic pattern such as bands, arcs, or “crown” geometry. Cylinder-derived sheet glass often shows repeating thickness variations and flow lines that correspond to the original cylinder. For vessels, pontil marks and uneven bases often reflect how the object was finished. A practical method is to sketch the main wave directions on paper, then compare them across multiple sections of the same piece.
Assess Bubbles And Their Position
Small bubbles can be normal in historical glass, but their distribution helps separate manufacturing from later damage. Bubbles trapped during melting and forming often appear as scattered points or elongated streaks aligned with flow. Bubbles that cluster along cracks or edges can indicate later stress or impact. Use magnification (for example, a 10x loupe) and note whether bubbles sit inside the bulk or only near the surface.
Use Simple Stress Clues
Residual stress can show up as subtle distortion under polarized light, but you can still gather clues without lab equipment. If the glass shows consistent warping across a panel and the warping pattern matches the thickness variation, annealing history likely played a role. A practical approach is to compare the pane’s flatness against a straight edge and measure the gap at the center with feeler gauges; even a 1–2 mm deviation across a small panel can correlate with uneven cooling.
Separate Patina From Optical Distortion
Surface haze, weathering, and mineral deposits can make glass look uneven even when the bulk is relatively uniform. Clean a small test area with a method appropriate to the object’s conservation status, then re-check the same light angle. If the “waves” remain unchanged after surface cleaning, the unevenness likely belongs to the glass body. If the appearance improves dramatically, surface deposits were a major contributor.
Beware Of Modern Repairs And Replacements
Modern leaded repairs, resin fills, or reassembled panels can change how medieval glass reads visually. Look for different refractive behavior around repair boundaries, mismatched thickness, or edges that look freshly cut compared with the surrounding patina. In practice, check the perimeter and any join lines with raking light; repairs often show a sharper contrast than the gradual transitions typical of original glass.
Educational Case Examples
Window Panel With Raking-Light Waves
An anonymized buyer inspects a small medieval-style window panel. Under straight-on viewing, the glass looks mostly clear, but raking light reveals repeating wave bands and thickness changes that follow a consistent direction across the panel. The buyer records that the pattern persists after wiping off loose dust, and the waves align with tool-like flow marks near the edges. The conclusion stays cautious: the unevenness likely reflects original forming and annealing rather than only surface grime.
Vessel With Pontil Scars And Bubble Streaks
A second scenario involves a glass vessel described as medieval. The base shows a pontil scar and slight asymmetry, while small bubbles appear as scattered points and a faint streak that curves with the vessel’s forming. The buyer compares photos taken with a phone flashlight at two angles and notes that the bubble streak remains internal rather than concentrated at the surface. The buyer avoids assuming “damage” because the features match typical historical forming signatures.
Comparison Checklist For Buyers
| Observation | More Likely Medieval | More Likely Later Work | What To Do Next |
|---|---|---|---|
| Wave pattern | Consistent across the panel, matches forming flow | Localized distortion near joins or repair lines | Use raking light and mark the pattern direction |
| Bubbles | Scattered or flow-aligned inside the bulk | Clustered at cracks, edges, or modern fills | Inspect with 10x loupe; note internal vs surface location |
| Surface haze | Gradual patina, consistent with age | Sharp boundary around a cleaned or repaired area | Do a small test cleaning only if conservation guidance permits |
| Edges and joins | Edges show older cutting/grinding character | Edges look freshly cut; joins show modern materials | Photograph perimeter with side light; ask about restoration history |
Common Mistakes When Interpreting
A frequent mistake is treating every wave as “authentic medieval.” Cracks, warping from thermal shock, and modern reassembly can all create unevenness. Another mistake is relying on one photo taken under diffuse indoor lighting; diffuse light hides thickness variation and makes different materials look similar.
People also overinterpret color. Medieval glass can show streaks from impurities, but modern glass can be tinted and aged to mimic those effects. Without knowing the object’s restoration history, appearance alone cannot confirm age. A practical frustration: sellers sometimes describe any unevenness as “handmade,” which can be true for many periods, not just medieval.
Finally, buyers sometimes clean aggressively to “improve clarity.” Surface cleaning can remove patina and change how light scatters, which can erase clues about original surface chemistry. If you plan any cleaning, follow conservation guidance for the specific object type and avoid solvents that could attack coatings or corrosion products.
FAQ
Why do medieval panes look wavy?
Waves often come from how sheet glass formed and cooled, which leaves thickness gradients and surface ripples. Uneven annealing can also retain stress that later shows as distortion under side lighting.
Do bubbles mean the glass is damaged?
Not automatically. Many medieval glasses contain bubbles trapped during melting or forming, and their internal distribution can look different from bubbles that cluster near cracks or modern repair boundaries.
Can modern glass be made to look medieval?
Modern glass can be tinted, textured, and aged, and repairs can introduce optical irregularities. Appearance alone cannot date glass reliably without provenance and, in some cases, material analysis.
How can I tell patina from true distortion?
Compare the same area under raking light before and after a minimal, conservation-appropriate surface cleaning test. If the wave pattern stays fixed in the bulk, distortion likely comes from the original glass.
What measurements help during inspection?
Simple checks like panel flatness against a straight edge and gap measurement at the center can correlate with uneven cooling. Recording light angle and photographing at consistent distances also improves comparison across sections.
Author's Insight
Uneven medieval glass usually reflects physical constraints: batch melting, forming methods, and annealing schedules that differ from modern continuous production. Light behavior explains much of what people perceive as “unevenness,” because thickness variation and surface ripples bend and scatter reflections. The most reliable approach stays observational and cautious: separate bulk features from surface haze, and treat repairs as a confounding variable. When dating matters, appearance supports hypotheses but rarely closes them.
Key Takeaways
- Unevenness often originates in forming and cooling, not only in later damage.
- Raking light and angle changes reveal whether waves match original flow patterns.
- Bubbles and distortion location help distinguish bulk manufacturing from edge-related stress or repairs.
- Surface patina can exaggerate optical effects, so minimal cleaning tests can clarify what you are seeing.
- Appearance supports careful judgment, but provenance and conservation history carry more weight for dating.